
Plugin Topics: Meta boxes in the Block Editor
Meta boxes work in Gutenberg but they may not do so for a while or be the best solution for your needs.
During the full migration to the Block Editor, WordPress Provides two compatibility flags.
Most of the time the compatibility setup works out of the box. However, you must test the meta boxes on Gutenberg to make sure the code will still work and that you won't need to write new blocks to handle the meta box data.
You also need to modify the add_meta_box() function to look like the example that follows:
<?php
function rivendellweb_custom_meta() {
  add_meta_box(
    'rivendellweb_meta',
    __( 'Meta Box Title', 'rivendellweb-textdomain' ),
    'rivendellweb_meta_callback',
    'post',
    'advanced',
    'default',
    array(
      '__block_editor_compatible_meta_box' => true,
      '__back_compat_meta_box'             => false,
    )
  );
}
add_action( 'add_meta_boxes', 'rivendellweb_custom_meta' );
Moving Forward: Store and Read Post Meta With A Block #
Meta boxes are not a good solution for providing custom text when working with Gutenberg in the long run. The best solution is to work with meta blocks, the Gutenberg equivalent of meta boxes.
As with many things in Gutenberg, you will see multiple ways to accomplish this; some of the factors involved:
- Whether you want to use ES5 or ES6+ to write Javascript
- Whether you want to use JSX or not.
This plugin will assume you are using ES6+ and JSX. It will also assume that you've initialized a block using the following command:
npm init @wordpress/blockThe command will create the block directory, install @wordpress/scripts and all the necessary dependencies, configure the block, and provide a set of commands you can run during development, finishing up with building the block for production.
Registering meta attributes in PHP #
The first step is to register the meta attributes we want to use in the block in the block's PHP file. We can register as many meta fields as we need to inside the function, they will all be instantiated when the init action runs.
<?php
// register one or more custom meta tag fields
function rivendellweb_register_post_meta() {
  register_post_meta( 'post', '_rivendellweb_protected_key', array(
      'show_in_rest' => true,
      'single' => true,
      'type' => 'string',
      'auth_callback' => function() {
          return current_user_can( 'edit_posts' );
      }
  ) );
}
add_action( 'init', 'rivendellweb_register_post_meta' );
Build the block in Javascript/JSX #
Now we move to the React-centric Gutenberg block creation process.
The first task is to import all the functions we'll need from the corresponding @wordpress scoped packages.
import { registerBlockType } from '@wordpress/blocks';
import { TextControl } from '@wordpress/components';
import { useSelect } from '@wordpress/data';
import { useEntityProp } from '@wordpress/core-data';
import { useBlockProps } from '@wordpress/block-editor';
We then call the registerBlockType() function to register the block.
registerBlockType( 'rivendellweb/meta-block', {
  title: 'Meta Block',
  icon: 'smiley',
  category: 'text',

  edit( { setAttributes, attributes } ) {
    const blockProps = useBlockProps();
    const postType = useSelect(
      ( select ) => select( 'core/editor' ).getCurrentPostType(),
      []
    );
    const [ meta, setMeta ] = useEntityProp( 'postType', postType, 'meta' );
    const metaFieldValue = meta[ 'rivendellweb_meta_block_field' ];
    function updateMetaValue( newValue ) {
      setMeta( { ...meta, rivendellweb_meta_block_field: newValue } );
    }

    return (
      <div { ...blockProps }>
        <TextControl
          label="Meta Block Field"
          value={ metaFieldValue }
          onChange={ updateMetaValue }
        />
      </div>
    );
  },
  // Data is saved to post meta via the hook
  // so we don't need to save it in the block
  save() {
      return null;
  },
} );
Before we build the plugin, we need to enqueue the plugin's scripts and all its dependencies. We use wp_enqueue_script() like we do to add all scripts to a WordPress installation.
<?php
function rivendellweb_enqueue() {
  wp_enqueue_script(
    'rivendellweb-script',
    plugins_url( 'rivendellweb.js', __FILE__ ),
    array( 'wp-blocks', 'wp-element', 'wp-components', 'wp-data', 'wp-core-data', 'wp-block-editor' )
  );
}
add_action( 'enqueue_block_editor_assets', 'rivendellweb_enqueue' );
Build the block #
Once we've written all the code, registered blocks, and meta fields we can build the block.
From the root of the plugin run the following NPM command:
npm run buildYou can zip the directory and upload it to your testing and production WordPress installations if there are no errors.
putting the meta block on the sidebar #
Rather than using a block to display the meta box to enter data, it may be a better idea to put it on the editor sidebar.
Doing so makes the meta box available at all times and is a good way to make the meta box more visible and ensure the user adds the data to the post. We can also write additional PHP code that will ensure it works regardless of the editor you use.
compat.php has all the code necessary to make the meta box work in the classic editor. We use include_once to include the file once. I will not cover the content of the file in this post.
<?php
if( ! defined( 'ABSPATH') ) {
    exit;
}

include_once( 'src/compat.php' );
The first PHP function we use will create the meta field, make it available on the REST API so it'll be usable in the block editor, and provide sanitization and authorization callbacks.
The sanitize_callback callback uses the built-in sanitize_text_field() function to make sure the input is clean before saving it to the database.
The auth_callback callback ensures that the person using the meta box can edit the post before being allowed to save the meta box data. It uses current_user_can() to perform the check.
We add the action to the init hook so it's available before we load the block.
<?php
function rivendellweb_register_meta() {
  register_meta('post', '_rivendellweb_text_metafield', array(
    'show_in_rest' => true,
    'type' => 'string',
    'single' => true,
    'sanitize_callback' => 'sanitize_text_field',
    'auth_callback' => function() {
        return current_user_can('edit_posts');
    }
  ));
}
add_action('init', 'rivendellweb_register_meta');
The second function enqueues the script for the meta box using wp_enqueue_script().
Note that we're passing an array of scripts our code depends on as the last argument. We'll look at these scripts later when we load and import them from Javascript.
<?php
function rivendellweb_enqueue_assets() {
  wp_enqueue_script(
    'metabox-sidebar',
    plugins_url( 'build/index.js', __FILE__ ),
    array(
      'wp-plugins',
      'wp-edit-post',
      'wp-i18n',
      'wp-components',
      'wp-data',
      'wp-element' )
  );
}

add_action( 'enqueue_block_editor_assets', 'rivendellweb_enqueue_assets' );
The next file we'll look at is build/index.js, the file that will actually create the meta box.
This is a React file but it's not like most other React projects.
We first import the files that package we want to use. These are all in the @wordpress scoped namespace. Note that we don't import React itself, this is handled by a default package, wp-element, a WordPress-specific layer built on top of the React package.
import {
  registerPlugin
} from '@wordpress/plugins';
import {
  PluginSidebar,
  PluginSidebarMoreMenuItem
} from '@wordpress/edit-post';
import { __ } from '@wordpress/i18n';
import {
  PanelBody,
  TextControl
} from "@wordpress/components";
import {
  withSelect,
  withDispatch
} from "@wordpress/data";
The first function builds the meta box. It handles the layout and calls the appropriate function to render the data if it exists and save it when the user updates or publishes the page.
The values for the text control value and onChange properties are generated by functions and passed as props to the control.
let PluginMetaFields = (props) => {
  return (
    <>
      <PanelBody
        title={__("Meta Fields Panel", "textdomain")}
        icon="admin-post"
        intialOpen={ true }
      >
        <TextControl
          value={props.text_metafield}
          label={__("Text Meta", "textdomain")}
          onChange={(value) => props.onMetaFieldChange(value)}
        />
      </PanelBody>
    </>
  )
}
The next two functions create higher order components (HOCs) to handle the state of the meta box.
The first component uses withSelect to inject the value of the meta field into the component. This is why whenever we return to a page with a meta box, the value of the meta field will be shown in the meta box.
The second component saves the meta field data to the database when the user updates or published the post. It uses withDispatch to update the specified meta field with the new data
For a good walkthrough of HOCs in Javascript and React see Higher-Order Components In React by Shedrack Akintayo in Smashing Magazine
PluginMetaFields = withSelect(
(select) => {
return {
text_metafield: select('core/editor').getEditedPostAttribute('meta')['_rivendellweb_text_metafield']
}
}
)(PluginMetaFields);
PluginMetaFields = withDispatch(
(dispatch) => {
return {
onMetaFieldChange: (value) => {
dispatch('core/editor').editPost({meta: {_rivendellweb_text_metafield: value}})
}
}
}
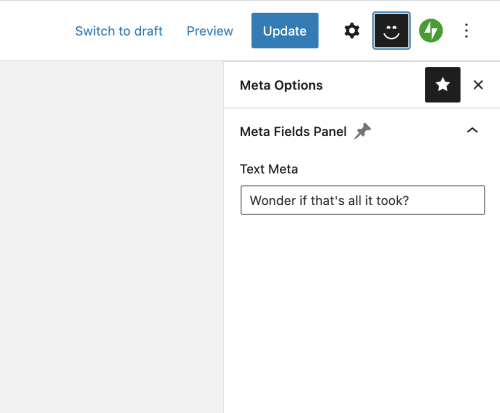
)(PluginMetaFields);The final function adds the meta box to the top navigation of the editor and wires it so that when you click the top navigation item (the smiley icon) the meta box will be shown.
registerPlugin( 'rivendellweb-sidebar', {
  icon: 'smiley',
  render: () => {
    return (
      <>
        <PluginSidebarMoreMenuItem
          target="rivendellweb-sidebar"
        >
          {__('Meta Options', 'textdomain')}
        </PluginSidebarMoreMenuItem>
        <PluginSidebar
          name="rivendellweb-sidebar"
          title={__('Meta Options', 'textdomain')}
        >

        <PluginMetaFields />
        </PluginSidebar>
      </>
    )
  }
})
Now we have a meta box that works in both the block and classic editors so we don't need to worry about compatibility :)

Using the meta block data #
Regardless of how we capture the data, we also need a way to display it. Currently, there are two ways to do so.
Use Post Meta in PHP actions #
The first way is to use PHP to insert content to the page using the value of the meta box.
This example will add the meta box data to the content of the page by using the the_content hook to add the processed data to the existing content.
<?php
function rivendellweb_content_filter( $content ) {
    $value = get_post_meta( get_the_ID(), 'rivendellweb_meta_block_field', true );
    if ( $value ) {
        return sprintf( "%s <h4> %s </h4>", $content, esc_html( $value ) );
    } else {
        return $content;
    }
}
add_filter( 'the_content', 'rivendellweb_content_filter' );
Use Post Meta in Block #
The second way is to use the post metadata in blocks. This example appends the data to the end of every Paragraph block when it is rendered. You can do this for any core or custom block types as needed.
The rivendellweb_render_paragraph() function sets up the content we want to use, in this case, the escaped meta value.
We then use register_block_type() in PHP to set a callback when the block is rendered to include the meta value.
In this example, we register the callback for all paragraph blocks. We could do it for any block type we've installed
function rivendellweb_render_paragraph( $block_attributes, $content ) {
    $value = get_post_meta( get_the_ID(), 'rivendellweb_meta_block_field', true );
    // check value is set before outputting
    if ( $value ) {
        return sprintf( "%s (%s)", $content, esc_html( $value ) );
    } else {
        return $content;
    }
}

register_block_type( 'core/paragraph', array(
    'api_version' => 2,
    'render_callback' => 'rivendellweb_render_paragraph',
) );