Mavo
Mavo is an extension to HTML created by Lea Verou as part of her work at MIT CSAIL. It caught my attention because it's a minimal setup system that does all of the heavy lifting for you (as we'll see when we look at how it works) and it can do fairly sophisticated projects.
To test Mavo I will use it to create a project listing for a portfolio. It will test Mavo's storage capabilities, how to create multiple entries in a single application and Mavo scripting features built into the platform.
What it is #
Mavo adds attributes to HTML that describe Web applications that manage, store, and transform data.
You can store data in the cloud, locally, or not at all by just changing an HTML attribute
With Mavo you can edit data right on the website, with an intuitive, auto-generated, customizable interface. No more wrestling with CMSes and servers!
There's a lot more you can do. Check the documentation and demos to get a feel for what Mavo is and what it can do.
How it works #
To go in-depth into Mavo we'll look at a full-blown Mavo application and break it down as needed to explain Mavo concepts and ideas... The portfolio app, taken from the Mavo Demos
<!DOCTYPE html>
<html lang="en">
<head>

<meta charset="UTF-8">
<title>Artist Portfolio</title>
<meta name="viewport" content="width=device-width, initial-scale=1">
<link rel="stylesheet" href="https://dev.mavo.io/dist/mavo.css">
<script src="https://dev.mavo.io/dist/mavo.js"></script>
<link rel="stylesheet" href="style.css">

</head>
To start create an empty HTML document and insert the following code in the head element:
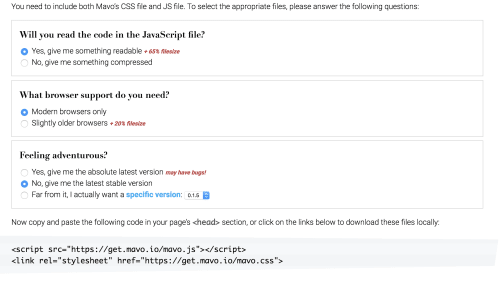
<script src="https://get.mavo.io/mavo.js"></script>
<link rel="stylesheet" href="https://get.mavo.io/mavo.css">
This will get the latest stable version of Mavo. If you want to get an uncompressed version, an ES5 version for older browsers or a specific version (other than the latest) head to get Mavo select from the options given and copy the code that will appear.

This will load Mavo but won't do anything with it... yet.
To start using Mavo add the following attributes to the root element of the Mavo application: mv-app="name-here" mv-storage="https://github.com/username/repo/". If you've worked with Angular or Vue in the past this should look familiar.
<body mv-app="portfolio" mv-storage="https://github.com/mavoweb/data/portfolio">These two attributes tell Mavo that this is a Mavo application with the given name and to use the indicated Github repository for data storage. Of course, you should have write access to the repository to save data there. If you don't you'll generate a Pull Request for the Repo owner with the changes you suggest.
We continue writing HTML for the header.
<header>
  <h1><a href="http://julesmuck.com">
  <img src="http://julesmuck.com/wp-content/uploads/2016/04/mucklogoBLCK.png"
    alt="Jules Muck"
    class="logo" />
  </a></h1>
</header>
Then we move to the individual paintings that are part of the portfolio. This is where the Mavo magic happens.
property names elements that will be saved, edited or used in expressions. This is how we tell Mavo that this is an element we want to work with.
typeof is what we use to tell Mavo the actual value of the element. It's not just an attribute or its text content, but the union of the values of the properties inside it. We can use it to force an element to be a group, or to declare the type of the group (e.g. typeof="Person") for richer semantic value
mv-multiple makes the element repeatable.
mv-attribute overrides the defaults for which attribute holds the data for this element. For no attribute (element content), specify "none".
mv-default gives the default value for the property. If you provide no value then the content becomes the default.
<div>
    <a property="painting" typeof="Painting" mv-multiple mv-attribute="none">
        <img property="image" />
        <p property="name" mv-default="[readable(to(filename(image), '.'))]"></p>
    </a>
</div>
Then we add the rest of the HTML content including the closing body and html tags.
<footer>All art belongs to the awesome <a href="http://julesmuck.com">Jules Muck</a>, used
  here with permission.</footer>

</body>
</html>
That's it… this is a fully-working Mavo application that will store its data in the Github repository you indicated in the root element of the application.
Projects project #
So now that we got an idea of how Mavo works let's see how well it works for our own projects.
I have a list of projects at different stages of completion that I would like to use Mavo, in its default configuration to create a list of project in different stages of completion.
The structure of the data is like this:
- Name of the project
- Description
- Date Started
- Date Ended (if applicable)
- Type of project. One of
- Code
- Writing
- Research Report
- Mixed
- Other
- Stage of the project. One of
- Idea
- Draft
- In Development
- Completed
- Published
- URLs
- Writing
- Code
- Other
- Additional Notes
The project had some baffling aspects (that I'm still working on understanding) and some very easy parts of the code. The full code is shown below, broken by sections to make sure that I cover some of the more baffling aspects of it.
The opening is similar to the example we used in the last section. I compiled Mavo from source to make sure I had the latest version instead of depending on the version hosted by the CDN.
I've also downloaded a plugin to use Markdown in the text areas. I'll come back to this because it was one of the areas that bit me when working on this project.
<!DOCTYPE html>
<html lang="en">
  <head>
    <title></title>
    <meta charset="UTF-8">
    <meta name="viewport"
      content="width=device-width,
      initial-scale=1">
    <script src="scripts/mavo.js"></script>
    <script src="scripts/mavo-markdown.js"></script>
    <link rel="stylesheet" href="styles/mavo.css">
    <link rel="stylesheet" href="styles/main.css">
  </head>
As normal we give the app a name and a location for storage.
  <body mv-app="portfolio"
    mv-storage="https://github.com/caraya/mavodata/data">
In the following sections, we begin defining the layout and data structure for the application using the structure we defined earlier.
Project name and description are self-explanatory.
In Project Chronology we use a few tricks to save typing. For the Date Started field, I'm assuming that if you didn't enter the starting date then the date is today. To represent this date we use some MavoScript to do so.
MavoScript is Mavo's expression language. More details at http://mavo.io/docs/mavoscript. To generate the date value in a human-readable format we use $now (number of seconds since 1/1/1970) and date() to generate the date itself.
If you don't enter a date for dateEnded I'm assuming that the project is still in progress.
Under Project Description came the first surprise. The original version of the code used textarea elements to hold the text to edit but, to my surprise, the plugins did not work. They only worked when I changed the elements to div.
    <div class="projects">
      <section typeof="Project"
        mv-multiple
        class="project-card">

        <h2 property="name"
          mv-default="Default Project Name"></h2>

        <fieldset>
          <legend>Project Description</legend>
          <div property="description"
            mv-default="Project Description"
            class="markdown"></div>
        </fieldset>

        <fieldset>
          <legend>Project Chronology</legend>
          <label for="dateStarted">Date Started</label>
          <input type="text" id="dateStarted"
            name="dateStarted" value=""
            mv-default=[date($now)]
            property="Date Started">

          <label for="dateEnded">Date Ended</label>
          <input type="text" id="dateEnded"
            name="dateEnded"
            value=""
            mv-default="In Progress"
            property="Date Ended">
        </fieldset>
This is where I got stuck for a while until I looked to a similar example (the talks demo in the demo section of the Mavo website). Looking at other people's code helps, really :-)
        <fieldset>
          <legend>Project Status</legend>
            <select property="status">
              <option selected>Idea</option>
              <option>Draft</option>
              <option>In Development</option>
              <option>Completed</option>
              <option>Published</option>
            </select>
        </fieldset>

        <fieldset>
          <legend>Project Type</legend>
            <select property="type">
              <option selected>Code</option>
              <option>Writing</option>
              <option>Research Report</option>
              <option>Mixed</option>
              <option>Other</option>
            </select>
        </fieldset>
In most other versions of this project, I've created nested structures for the URLs. With Mavo that was not necessary. The JSON structure is flat so I can save myself from having to do, or ask Mavo to do, weird acrobatics to get the JSON the way I want it.
        <fieldset class="links">
          <legend>Links</legend>

          <label for="codeURL">Code</label>
          <input type="text" id="codeURL" name="codeURL"
            value="" mv-default="N/A" property="Code URL">

          <label for="writeupURL">Writeup URL</label>
          <input type="text" id="writeupURL" name="writeupURL"
            value="" mv-default="N/A" property="Writeup URL">

          <label for="otherURL">Other URL</label>
          <input type="text" id="otherURL" name="otherURL"
            value="" mv-default="N/A" property="Other URL">
        </fieldset>
Project Notes is the last item in each individual project card before we close the page.
        <fieldset>
          <legend>Project Notes</legend>
          <div property="notes"
            mv-default="Project Notes"
            class="Markdown"></div>
        </fieldset>

      </section>
    </div>
  </body>
</html>
I used some CSS to make the cards responsive using Flexbox. We also make some items flex horizontally to increase readability but, as you can see below, there is not that much CSS to use to tweak the Mavo-enhanced code to look the way I want it to.
.projects {
  display: flex;
  flex-flow: row;
  flex-wrap: wrap;
}

.project-card {
  margin: 2em;
  padding: 1em;
  border: 1px solid navy;
  border-radius: 10px;
}

label {
  font-weight: 700;
}

.links {
  display: flex;
  flex-direction: column;
}

.links input {
  width: 100%;
  margin-bottom: 1em;
}
Conclusions And What's Next #

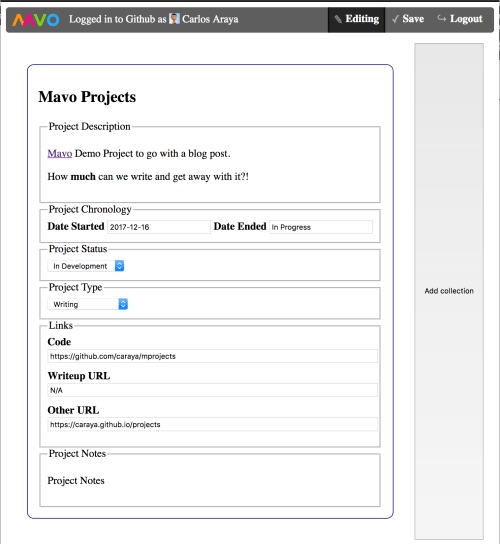
Mavo Projects Current Version
I love Mavo.
Once you figure it out and learn to play by its rules it becomes second nature to create fully editable content without having to worry about configuring and customizing a CMS or having to learn a whole new syntax to create your content and structure.
It's not perfect, no tool is. While it's true that you don't have to learn a whole new interface to build your apps, you still have to learn the additional attributes that Mavo uses… but it's still a more gentle learning curve. One of the most confusing aspects is that the documentation shows more than one way to assign properties to an element.
There are some aspects that I'm still trying to figure out that will go into a future iteration of the project. Some of the things I'm looking at after MVP:
- Pagination: Because there are many cards on the page, it would be nice to show them 6 at a time and then have a pagination system to move between the pages. According to a tweet from Mavo there is a way to do pagination. Trying to figure out if it's worth it or whether I should wait until Mavo provides an easier way to do it
- Moving the backend to Firebase using a plugin
- Test the application for accessibility
- Hide URLs without a value... N/A works for now but it doesn't convey the fact that if we don't have a value then the link shouldn't be there. This should be possible to do with Mavo Script, still trying to figure out how
