Dublin Library

The Publishing Project

Using figures and Flex-box to align captions


As I learn how to be more flexible in working with art direction for web content, I'm documenting some of the cool things I've learned. Because I'm using flexbox, I'm relying on CSS Trick's [A Complete Guide to Flexbox](https://css-tricks.com/snippets/css/a-guide-to-flexbox/) to reference the Flexbox aspects fo the elements. ## Figures as flex containers If we make a [figure](https://developer.mozilla.org/en-US/docs/Web/HTML/Element/figure) into a flex container we gain a lot of flexibility in how we place captions around the image. This is the image that we'll play with. ```html

Pablo Neruda Facts

Pablo Neruda Portrait

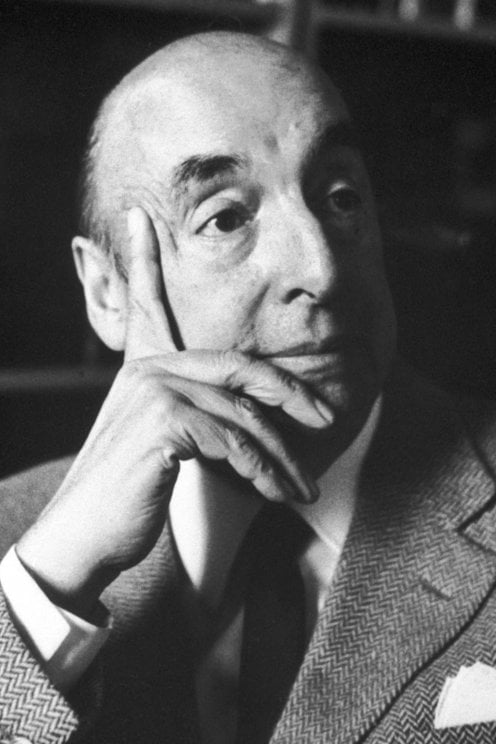
Pablo Neruda, original name Neftalí Ricardo Reyes Basoalto, (born July 12, 1904, Parral, Chile — died September 23, 1973, Santiago), Chilean poet, diplomat, and politician who was awarded the Nobel Prize for Literature in 1971. He was perhaps the most important Latin American poet of the 20th century.

``` This is the basic CSS that will place both the image and the caption in a row, the caption aligned to the top of the image. We define the image as being 30vw (viewport width units) wide and having no margin at the bottom of the image. We add a deep red bar on the left side of the [figcaption](https://developer.mozilla.org/en-US/docs/Web/HTML/Element/figcaption) element. The caption is placed at the top, flushed with the image. We also make the caption 25vw wide as an initial value that we can play with it later. ```css figure { display: flex; flex-flow: row; justify-content: flex-start; } img { width: 30vw; margin-bottom: 0; } figcaption { align-self: flex-start; border-left: 1em solid rgb(169, 13, 94); padding-left: 1em; margin-left: 2em; width: 25vw; } ``` You can see the result of this initial test in [this pen](https://codepen.io/caraya/pen/YzzXVqJ) ## Vertical caption alignment One of the first changes that I want to experiment with is changing the vertical placement of the caption to the side of the image. We modify the style for the `figcaption` element to tell it where we want to place the caption relative to the image. All we need to do is change the `align-self` attribute in the `figcaption` element. The code below will align the caption to the bottom of the image. ```css figcaption { align-self: flex-end; border-left: 1em solid rgb(169, 13, 94); padding-left: 1em; margin-left: 2em; width: 25vw; } ``` This pen illustrates [aligning to the bottom of the image](https://codepen.io/caraya/pen/YzzXVqJ) We can also center the caption related to the image by changing the `align-self` selector to center instead of `flex-start` or `flex-end`. ```css figcaption { align-self: center; border-left: 1em solid rgb(169, 13, 94); padding-left: 1em; margin-left: 2em; width: 25vw; } ``` This pen [shows vertical centering](https://codepen.io/caraya/pen/gOOpWoV?editors=1100) ## Moving captions to the left of the image Moving the caption to the left of the image helps with balancing the flow of text or just to make the images look different by playing with the captions in ways the reader might not expect. To move the caption we have to change the `flex-flow` attribute to reverse the order in which the objects appear on the screen. In the `figure` element we set the `flex-flow` to `row-reverse` meaning that the browser will display the content from right to left. Since the image is the first element in document order it will appear to the right with the caption to the left. We must remember that because we flipped the order of the items we also have to change the way we justify the content, in this case to `flex-end` if we want the figure to stay on the left side of the screen. ```css figure { display: flex; flex-flow: row-reverse; justify-content: flex-end; } ``` We also to change the `border-`, `padding-`, and `margin-` to right, moving the bar and space between the bar and the caption to the right side. ```css figcaption { align-self: flex-end; border-right: 1em solid rgb(169, 13, 94); padding-right: 1em; margin-right: 2em; width: 25vw; } ``` The tricks for vertical alignment work on the right side too. The example pen [is here](https://codepen.io/caraya/pen/RwwPOBQ?editors=1100) ## Captions above or below the image Changing the value of `flex-flow` we can place the caption above or below the image. The example below puts the caption text below the image. The figure now flows vertically using `flex-flow: column` and has an explicit width that is as wide as the image inside. ```css figure { display: flex; flex-flow: column; width: 30vw; } ``` We control the alignment of the caption element using the `align-self` attribute. In this case, the caption is left aligned. We can add borders to highlight the caption. In the example, we added the same border at the top and bottom. Controlling the width of the caption and the font size gives us a little more control over what we can do with the caption, as shown in this [example Codepen](https://codepen.io/caraya/pen/mddeLKq) ```css figcaption { align-self: flex-start; border-top: 2px solid rgb(169, 13, 94); border-bottom: 2px solid rgb(169, 13, 94); font-size: 80%; width: 20vw; } ``` To place the caption above the image we need to make a single change; use `flex-flow: column-reverse` in the figure styles. ```css figure { display: flex; flex-flow: column-reverse; width: 30vw; } ``` In the [example pen](https://codepen.io/caraya/pen/eYYpPoR?editors=1100) you may want to adjust the bottom margin to create some space between the caption border/line and the image.

Edit on Github